Posted on

Starting or Opening PowerShell on Windows 10

There’s tonnes of great PowerShell resources online, and quite often they’ll give you a script or a command to run, but fail to mention how exactly you should do that!

Here’s a couple of methods.

Open PowerShell on Windows 10

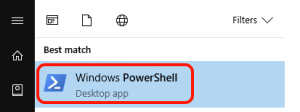
On Windows 10 the easiest way to open PowerShell is to click on the start button and just being typing PowerShell.


The PowerShell window with a blue background and white text should now display. Some commands may require you to run PowerShell as an administrator.

Open PowerShell from the Command Line

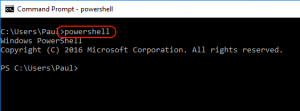
If you happen to be working inside a command prompt you can achieve a similar result by just typing and entering PowerShell on the command line.

When it is run this way the default background and text colour is not the familiar blue and white because that colour scheme is set in the properties of the start menu shortcut. You can alter these properties yourself though by pressing alt+space and selecting Properties.

Just type Exit to get out of PowerShell.

Posted on

Geckoboard API via VBscript

Geckoboard is a great tool for any organisation that needs to track KPI’s, statistics or other pertinent live information. It is particularly well suited to displaying live information on large screens around the office.

Whilst Geckoboard integrates into a lot of different services already there’s a fair chance you’ll want to display information from other sources too.

Fortunately it features a relatively new API that allows for external data to pushed up to the board in the form of ‘datasets’ which can then be displayed in various ways.

In my case I wanted to use VBscript to pull data out of Microsoft SQL Server and display them on the board. Unfortunately the samples of the site were for other programming environment and did not seem to directly apply to me. It took a friendly soul on the message boards to point out that the API is actually a REST service and the various demo code was just a wrapper for that.

I hadn’t done much using RESTful APIs in the past, although I have done a fair bit using SOAP/XML so I figured this would be straightforward.

I found that this wasn’t too hard, and I will document the various samples. If you already know how to drive node.js or Ruby then those environments might suit you also. In my case I wanted to use VBscript because it’s light and simple, and will run on any Windows computer without having to install any tools or frameworks.

The API Key

In the sample code in the Geckoboard API docs, the API key is specified. A base64 encoded version of the API key actually needs to be sent in the query and I imagine the node.js framework takes care of that part. In my sample code I just send the base64 version of the key. Follow the Geckoboard instructions on how to retrieve your unique key, and then Google for a tool to base64 encode it. Use the encoded version of the string in the samples provided. Obviously I could convert the key to base64 every time but I just don’t see the point because it only ever really needs doing once.

Authentication

The Datasets API only accepts secure connections. So you must make all requests over HTTPS.

You can test your API key is working with the following sample code. Replace the base64 encoded auth key with your own.

Dim restReq, url, authkey

URL = "https://api.geckoboard.com/"
authkeybase64 = "putyourkeyhere-inbase64format!"

Set restReq = CreateObject("Microsoft.XMLHTTP")
restReq.open "GET", url, false
restReq.setRequestHeader "Authorization", "Basic " & authkeybase64

restReq.send ""

WScript.Echo restReq.responseText

You should get a 200 response containing {}

Make sure you have this working before trying to create a dataset, or before updating a dataset!

Creating a new dataset

Edit the URL string and specify the name of your dataset. When you update the dataset later on you’ll specify the same name. Edit the JSONstring to suit your own needs – see the API docs for more info on the various data types and formatting

Dim restReq, url, authkey, JSONstring

Set restReq = CreateObject("Microsoft.XMLHTTP")

url = "https://api.geckoboard.com/datasets/yourdatasetname"
JSONstring = "{""fields"": { ""anamountfield"": { ""type"": ""number"", ""name"": ""Amount""} } }"
authkey = "putyourkeyhere-inbase64format!"

restReq.open "PUT", url, false

restReq.setRequestHeader "Authorization", "Basic " & authkey
restReq.setRequestHeader "Content-Type", "application/json"

restReq.send JSONstring

WScript.echo("Geckoboard responded with: " & restReq.responseText

A response string containing your JSONstring data should come back. The dataset will also be available in Geckoboard, although of course there’s no data in it yet!

Replace all data in a dataset

Of course edit the URL to match a dataset that you want to replace. Also substitute your own API key that has been encoded in base64 format. Your JSONstring will also be your own.

Dim restReq, url, authkey, JSONstring

URL = "https://api.geckoboard.com/datasets/yourdatasetname/data"
authkeybase64 = "putyourkeyhere-inbase64format!"
JSONstring = "{""data"": [ {""anamountfield"": 7} ] }"	

restReq.open "PUT", url, false
restReq.setRequestHeader "Authorization", "Basic " & authkeybase64
restReq.setRequestHeader "Content-Type", "application/json"

restReq.send JSONstring

WScript.echo("Geckboard responded with: " & restReq.responseText)

A response string containing your JSONstring data should come back. The dataset will also be available in Geckoboard, although of course there’s no data in it yet!

The formatting of your JSON string is highly situational – you can test it using plenty of online JSON checkers. Remember in VBscript that you escape a double quote character by using two of them. So replace any instances of “” with a single ” in any checkers.

Appending data to a dataset

This is now possible. Only one small change is needed to the code that replaces the dataset – replace the PUT verb with POST and you’re set. Brilliant!

To be complete, change the appropriate line to

restReq.open "PUT", url, false


Hope this helps!
 

Posted on

Simulating Calculated Fields in Order Porter Templates for QuosalSell

At my work we use a product called QuosalSell to produce quotes that are delivered to customers via a web service. The quotes are viewed in customised templates that are essentially HTML documents with a few product-specific tags inside them that are substituted with data from the quote, and conditionally display various quote elements depending on some conditions.

This is all fine and dandy until i came upon a need to show only the Price+GST (tax) price on line items. There was apparently no “tag” for that value and the knowledgeable Quosal support confirmed that I was essentially out of luck unless I was willing to make significant compromises.

Woe is me. I was a bit annoyed for a few hours. Then it occurred to me that because I had access to the template that I could insert a bit of javascript that runs in the browser that will take the old price, perform a calculation on it, and replace it within the page.

Bwahaha the end user will never know.

So here it is. Try at your own risk, although it works for me just fine. You can very easily break an Order Porter template so I suggest backing it up before you change anything. You can also assume that this will be totally unsupported by Quosal and certainly unsupported by me.

My suggestion would be to create a new copy of an Order Porter template group so you don’t mess up any existing templates. Edit the “EntryPoint” document.

Place the following code in a sensible place AFTER the fields you want to modify. Right down the bottom is probably not a bad idea.

<script>
var x = document.getElementsByClassName('exprice');
var i;

for (i = 0; i < x.length; i++) {
  var exPrice = x[i].innerHTML
  incPrice = Number(exPrice.replace(/[^0-9\.]+/g,"")) * 1.1; 
  var incPrice = incPrice.toFixed(2);
  if (incPrice.length > 6) {
    incPrice = incPrice.slice(0, incPrice.length-6) + "," + incPrice.slice(incPrice.length-6);
  }
  x[i].innerHTML = "$" + incPrice ;
}
</script>

So what happens here? This bit of code executes in the browser and searches for all the elements with a class name of “exprice” and returns them as a collection. The collection is iterated through – and the value is read in, stripped of boring characters, multiplied by 110%, rounded to two decimal places and then formatted with a dollar sign and possibly commas. It is then output back into the “exprice” class and the user knows no difference.

So then… all that is left is to place classes around values in the template that you want to change.

This is a sample of a line that was interesting to me:

<td class="right">#Item.PrintedPrice</td>

We simply need to wrap a DIV tag around the value I want to replace and give it the right class name:

<td class="right"><div class="exprice">#Item.PrintedPrice</div></td>

Save the template and upload template metadata to Order Porter. Create or modify a template ensuring that you choose the new template group on the Publish page.

I hope this helps someone!

Posted on Leave a comment

Saving HTML5 Canvas to a Web Server using Classic ASP.

HTML5 brought a bunch of new features including the canvas. The canvas allows for us to draw on it, create shapes and perform other graphical activities.

Handily, the canvas allows us to access the data that represents what is drawn on it, and sometimes we want to send that back to a web server. One example use for me has been to accept a signature at the end of a document, and save the signature data back to the web server. If you like, the web server code can convert the canvas data back into an image fairly easily.

In my case I had a Windows web server running IIS on Server 2012 R2 and all of the samples I could find involved building web services using Visual Studio. I really just wanted something simple. Here’s what i came up with, and it works. Feel free to improve upon it or do whatever you will.

How it Works

Construct an event that retrieves the data from the canvas using the .toDataURL() function. The result is a Base64 encoded string that represents the image data. you can actually use that string as a target for an image in HTML instead of linking to a physical file. This is very cool.

Check out the documentation for the function to see other options for producing data for a JPEG.

Once we have the data in a variable we can perform an HTTP POST command to submit our data to the web server. You might be familiar with the HTTP GET method of passing data between web pages, where parameters are passed like:

http://mysite/myapp.aspx?user=Barry&age=99

This works well enough for simple applications but the downside is that the data is visible, and has a length limit. Submitting data as a POST (like a form submission would) makes the URL neater, and provides for submissions of any size.

The page we call on the web server can then simply read the HTTP POST variables and deal with the data accordingly. You can also respond back and pass text to the browser (this is essentially one of the main mechanisms for web pages to dynamically update content based on queries or real time events). In this case we’re just going to wait for a simple “OK” text string to come back.

In The Browser

We’re sending a variable called fileData with a string stored in PicData. you can append other variables and values as needed too.

PicData = signaturePad.toDataURL();

// Sending the image data to Server
var formData = new FormData();
formData.append('fileData', PicData);
var xhr = new XMLHttpRequest();
xhr.onreadystatechange = function() {
  if (xhr.readyState == 4 && xhr.status == 200) {
    if (xhr.responseText == "OK") {
      // received an OK back. You could send other messages back here too and update or reload the page as needed.
    }
  }
}
xhr.open('POST', "/uploadCanvas.aspx", true);
xhr.send(formData);


On the Web Server (IIS) End

Create the uploadCanvas.aspx file and place the following text into it. This sample creates a text file and saves the signature into it which is NOT something you would ordinarily do – it’s just an example. Your web server would require permissions to write to the folder, and if you get it wrong people might download your files directly. So please adapt this to your situation.

This is tonnes simpler than building a full blown .NET app with Controllers and other things. If you’re just a bit of a hacker like me then this might suit you too.

I imagine doing the same thing in PHP would be quite simple too.

<%
Dim myFileData, f, FSO
myFileData = Request.Form("fileData")
' If you passed other data you can retrieve them here too

FSO = CreateObject("Scripting.FileSystemObject") 
f = FSO.CreateTextFile("d:\webapp\signatures\example.txt", true)
f.Write(myFileData)
f.Close

' Send a simple OK back. You could send other data, or even HTML back.
Response.Write("OK")
%>


And Just One More Thing

It should be quite straightforward to convert the string to a binary file using a Base64 function if you need to do that. For me, I used the data string as the target for an <IMG> tag so that i could build an HTML document on the web server that contained the (signature) image embedded into it. I actually avoided the need to build a PDF document as it suited my needs well enough.


Posted on Leave a comment

Minecraft Python Script to Create a Hollow Sphere

For a few years now I casually use a bit of lazy script to do boring things in Minecraft for me. Like, when the kids want to empty out an ocean or dig a big hole. One day I decided to build an enormous sphere just because.

You can read my other article on how to set this up first.

I’ll do this in sections so you know what’s going on. There are definitely many optimisations to make, so be kind. I’m perfectly aware that the distance can be calculated with sqrt(x^2 + y^2 + z^2). Obviously there’s heaps of mods that can do this sort of thing too. But this is more funner.

Can you make some minor changes to build an enormous dome over a city? Or to create an underwater Atlantis?

#!/usr/bin/python

# This script builds a sphere at the specified centre co-ordinates

import pprint
import os
import math

#diameter of sphere - radius is obviously half of this - always make it odd to keep things easy
n = 101

#centre coordinates
Start_X = 200
Start_Y = 130
Start_Z = 300

#sphere material
sphere_block = "stained_glass 3"
inside_block = "air 0"

##########
# START
##########

# the radius is how many blocks radiate from the centre.
# I choose to always make the sphere an odd diameter so that there is always a centre block and then an equal number of blocks radiating out
radius = (n-1) / 2

# when I put my co-ordinates in it is easier to specify where I want the centre to be
# therefore I fudge the co-ordinates a bit to offset this
Start_X = Start_X - radius
Start_Y = Start_Y - radius
Start_Z = Start_Z - radius

# create a massive in-memory 3d array that will contain the sphere
# fill it full of 0s to represent empty air initially
sphere = [[[0 for k in xrange(n)] for j in xrange(n)] for i in xrange(n)]
# iterate through all elements in the array and if the (rounded) distance from the centre to the element is less than or equal to the radius then it must be inside the sphere
# mark all the elements inside as a 1
for x in range(0, n):
for y in range(0, n):
for z in range(0, n):
xradius = abs(radius - x)
yradius = abs(radius - y)
zradius = abs(radius - z)
myradius = math.sqrt((xradius * xradius) + (yradius * yradius))
myradius = math.sqrt((myradius * myradius) + (zradius * zradius))
if round(myradius) <= radius:
# 0 is outside the sphere
sphere[x][y][z] = 1

# iterate through all the array elements and find ones that don’t touch any outside blocks. They are therefore inside blocks
# no need to iterate through the array elects on the “outside” of the cube as by definition they cannot be inside blocks - so that at 1 and loop through to n-1
# note that we only have to check 6 locations for each array element - each of the sides and above and below it
for x in range(1, n-1):
for y in range(1, n-1):
for z in range(1, n-1):
if (sphere[x+1][y][z] != 0) and (sphere[x-1][y][z] != 0) and (sphere[x][y+1][z] != 0) and (sphere[x][y-1][z] != 0) and (sphere[x][y][z+1] != 0) and (sphere[x][y][z-1] != 0):
# 2 is inside the sphere
sphere[x][y][z] = 2

# we are done, now just loop through and output all the elements that equal 1. Remember 0 is outside and 2 is inside.
# you could obviously output the elements equalling 2 as well if you want a solid sphere, or want to fill it with something cool like water or lava.
for x in range(0, n):
for y in range(0, n):
for z in range(0, n):
if sphere[x][y][z] == 1:
cmd = "screen -x minecraft -X stuff '/setblock " + str(Start_X+x) + " " + str(Start_Y+y) + " " + str(Start_Z+z) + " " + sphere_block + " replace\x0D'"
os.system(cmd)


Posted on Leave a comment

Scripting Minecraft with Python under Mac OSX

My kids really love Minecraft. They begged me for the game until I relented. Then they played it whenever they could.

I just didn’t get it. It kind of looked a bit crap. Even adults seemed to be completely enamoured by it, which I just didn’t get.

Then, one Good Friday we were sitting around the kitchen table playing games and I picked up my son’s iPad and gave it a try.

Damn. Okay. I can see where the interest is. I was digging underground tunnels, and even in the fairly limited mobile version we had a lot of fun playing together.

Fast forward a little bit and I ended up running up a server for the kids to play on because I didn’t rally like the idea of them out there joining random servers with strangers, and also, TNT. The boy likes to blow things up.

So I set them up with a server on my little Mac mini server at home, and they’d invite their friends on and everything was peachy.

And then one day I was on playing with them and was diligently mining out some tunnels and thought, “Damn this is tiresome, surely there’s a better way to dig these mile long tunnels?”

Turns out there is!

Small disclaimer. Minecraft is so unbelievably hackable  I’m sure there are MANY ways to script, modify and extend it. I’m also sure there’s better code than mine. But it works for me, and might be useful for others too. No hate, bro.

Running the Server

Okay. So this will definitely work under pretty much any version of Mac OSX, and probably also Linux. I don’t know about Windows as I’m using the screen utility to make it possible. There might be a way but I don’t know.

Using this method we’ll be able to add blocks through python code from the server end without anything on the client end. You can log in and watch the blocks as they’re placed, which is kind of mesmerising and cool 🙂

Now then, we need to run the Minecraft application on the server in a screen instance. This will allow us to pass commands into the screen session from our Python script.

Here’s something similar to my Minecraft startup script. It changes into the Minecraft directory and runs screen with a session name of “minecraft” which then runs your typical Minecraft command line to invoke java and load the application.

Create a text file called something like mcstart.command and launch Minecraft similarly to below. You’ll need to substitute for your Minecraft directory – and be careful of the line wrapping (there’s only 3 lines).

#!/bin/bash
cd ~/mcserver
screen -S minecraft java -Xmx1024M -Xms1024M -jar minecraft_server.1.10.jar nogui

You might need to make the file executable with:

chmod +x mcstart.command


Cool! So now launch Minecraft from the script which will run inside a screen session called “minecraft”. In OSX you should be able to double click mcstart.command to make it run too. I’ll leave it up to you to add it to your startup items so it launches every time your computer restarts.

Now on the server end also you can create a python script to send commands into the screen session.

Try something like this. Create a file called mcscript.py and edit it. Put something like this in:

#!/usr/bin/python

# Setup our co-ordinates
Start_X = 10
Start_Y = 70
Start_Z = 20

# Define the block to use
Our_Block = "double_stone_slab 4"

cmd = "screen -x minecraft -X stuff '/setblock " + str(Start_X) + " " + str(Start_Y) + " " + str(Start_Z) + " " + Our_Block + " replace\x0D'"

os.system(cmd)

Run the script from the command line by using:

./mcscript.py

You may also need to make it executable.

In the above code we define some co-ordinates. The X co-ordinate in Minecraft increases to the east, Z increases to the north, and Y is the vertical co-ordinate. Note that Y values less than about 65 is probably underground, and cannot go above 255.

The variable Our_Block in the code defines the block and variation. If you search online for something like “Minecraft ID List” you should find plenty of references to the various blocks. Things can be named strangely. Powered rails for example are “Golden_Rail” or something.

Obviously you can use loops to output more than one block. On my modest Mac mini scripts can place about 30-50 blocks per second.

  • Note also that you don’t seem to be able to place blocks that are far away in the world from an active player. An error along the lines of “can’t place block outside of the world” is shown in the screen session.
  • Remember that you can see your current co-ordinate by pressing F3. You can also get close to a particular block and mouse over it to see the co-ordinates while the F3 info is shown
  • The Y co-ordinate seems to be where your head is. For the block under your feet subtract 2.
  • Existing blocks can be replaced with “Air 0” too!


I hope this helps!